Hanging with my Gnomies
I made one gnome a few months ago and now I can't be stopped! I think I need an intervention! I really am in love with these and plan on making one for every month to go with my tiered tray. They are just so cute and there are so many options!
I started off with this "Farmhouse with Coffee" gnome and learned a lot from it. Mostly what not to do. Then I moved on to a "Fall" gnome and some "Halloween Witch" gnomes; and I have some of the materials for Christmas gnomes next.
The great thing is that the materials are pretty cheap and you get a 3-4 gnomes from it. All the accessories for my fall and Halloween gnomes were gathered at the dollar store and I still had pieces left over.
Supplies
- Old socks. I used old athletic socks to hold the rice and then covered them with fuzzy socks. I could probably get away with just the fuzzy socks but like the extra protection should it get a hole. I didn't buy any socks, just used old ones that needed to be trashed anyhow = FREE
- A huge bag of rice from the grocery store. I probably paid $3.00 for it and can get more than 10 gnomes from it, so maybe $.50 a gnome?
- Rubber bands (you can get a bag of 100 for $1 so I don't even factor it into the price)
- Fur material. I bought these at Joann's Fabric and can get 4 gnomes from one package ($1 a gnome)
- Material for the hat. I shop the fat quarter bargain bins so it probably averages around $1 a gnome. The price will depend on what you want to use.
- Small wood beads for the nose. You can get a small bag of them and it ends up being around $.10 per bead.
- Hot glue (assuming you have this or you shouldn't be crafting)
- Variety of accessories. Price depends on what you find.
On average each gnome cost me less than $5 to make.
Instructions
Fill the first sock with rice. I recommend using a funnel, and then close it off with a rubber band. Cut off any excess sock, if needed.
Cover with the fuzzy sock, also closing it with a rubber band and cutting excess, if needed. But I kept a lot of it on to fill the hat so it would stand up straight.
If you use the same fur I recommended, you can cut it in half lengthwise. Then cut that in half using an arc shape. LESSON #1: Only cut the backing with the scissors. Do not cut the fur too or it will look weird. When you cut the backing, the fur will pull away and look natural. If you cut it all the way through, it will look very blunt, like your gnome went to a bad barber. You can see I did that a little below.
Hot glue the beard to the sock at the hight you like. Make sure it is high enough - remember you can't see gnomes' eyes.
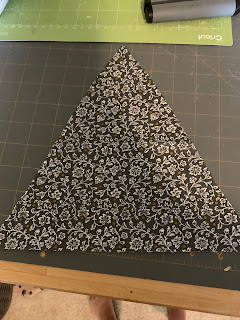
Now to make the hat. Measure your gnomes head and then cut a triangle in the fabric that will fit your gnome. Hot glue the long edges of the triage together to make a pointy hat. Lesson #2: The first time, I tried to glue it to the gnomes head first and then close the triage. Big mistake. Looked horrible. After that, I started making the hat, trusting it would fit ok, and then glued it to the gnome's head afterwards.
Once the hat is secure, glue the wood bead notice right underneath it, making his eyes look like they are under his hat.
Then add any accessories you want. The coffee cup is actually from the button aisle at Joann's.
Here are a few more I made! All these accessories were from the dollar store! Multiple items in a pack so I could make more.


Comments
Post a Comment